Piwik Pro Integration (BETA)
Connect Varify to Piwik Pro through the Piwik Tag Manager with the required variables, events and tag.
In short
With the help of the Piwik Tag Manager, you can easily connect Varify.io with Piwik Pro to analyze your experiments. To do this, create the necessary variables, events and a tag to connect Varify.io with Piwik Pro. You can then segment according to your variants in Piwik Pro.
Tracking setup setting
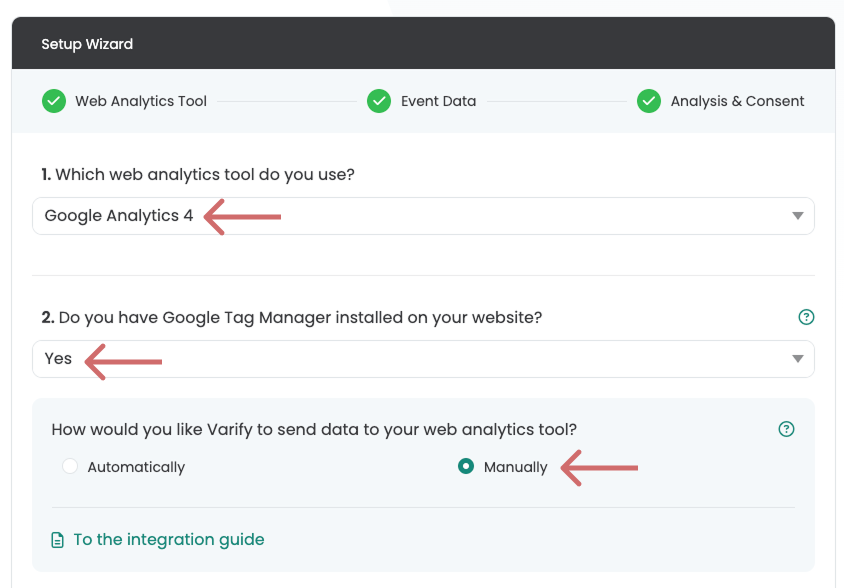
Before you start, you should read the Tracking setup in Varify in such a way that Tracking events to Piwik can be sent. To do this, open your Dashboard and navigate to "Go to Tracking Setup".

Set the Tracking setup in Varify as follows:
- Which web analytics tool do you use? → Google Analytics 4 (Yes, this setting is correct)
- Do you have Google Tag Manager installed on your website? → **Yes
**Also choose **"Yes"**if you only use the Piwik Pro Tag Manager integrated on your website. - How would you like Varify to send data to your web analytics tool? → Manually
Custom Dimension created
Go to Piwik Pro Analytics and create a New user-defined dimension.
Settings for the custom dimension:
- Type of custom dimension: Session dimension
- Name of the dimension:
Varify_abTest_event_scope
Setup in Piwik Pro Tag Manager
After you have Custom Dimension you can now use the Piwik Pro Tag Manager continue. Here a Day be created, which Experiment information from the DataLayer an Piwik Pro Analytics sends.
1. create a data layer variable
These Variable is required to use the Day with the information of the A/B tests to provide.
Settings for the variable:
- Name of the variable: z. B.
VA Short(or choose your own name) - Name of the data layer variable:
varify_abTestShort(spelling obligatory)
2. Create a trigger
The Trigger reacts to a DataLayer event and is the decisive element that enables the transmission of the Experiment data to the Analytics system triggers.
Settings for the trigger:
- Name of the trigger: z. B.
Varify Event(or choose your own name) - Trigger type: DataLayer Event (spelling obligatory)
- Event name:
varify(spelling obligatory)
3. create a custom dimension tag
Tags are code snippets that contain the Values stored in variables to your Analytics tool send.
Tag configuration:
- Name of the tag: z. B.
Varify.io - Tracking Linker(or choose your own name) - Configuration tag: Custom Dimension Tag
- Select custom dimension:
Varify_abTest_event_scope(the previously created custom dimension) - Dimensional value:
{{VA Short}}(the created variable) - Trigger: **The previously created **
Varify Event
4. create an HTML tag
- Now create a new custom HTML tag here.
- Name the tag:
Varify Activate Tracking - Paste the following code into the HTML field.
- Save the tag with a trigger that fires as soon as your Piwik tracking is active.
Note: If the tag is not triggered, no events are sent to Piwik
<script>
    var active = true;
    window.varify.setTracking(active);
</script>
Check your tracking integration
To ensure that everything is connected correctly, we recommend that you start an A/A test. This will allow you to ensure that everything is working correctly before you start testing.
You can find out exactly how an A/A test works here: Start an A/A test and check the tracking