econda integration
Connect econda Analytics to Varify, either directly via emos3.send() or through the Google Tag Manager.
In short
You can easily connect econda Analytics to Varify.io to analyze your A/B test results directly in econda. There are two ways to do this:
- Direct integration - Varify sends the experiment data directly via
emos3.send()to econda. No tag manager required. - Google Tag Manager - The tracking events are transmitted to econda via the GTM.
Choose the variant that suits your existing setup.
Sending Varify events with or without user consent
You have the option of loading the Varify script directly so that experiments can also be delivered without user consent (no legal advice - you have to make the decision yourself). Regardless of this, you can only send the tracking events to etracker after user consent has been granted. Alternatively, you can also integrate the Varify script only after user consent.
Option 1: Experiment delivery without user consent, tracking with user consent
Embed the Varify script directly without user consent. econda tracking, on the other hand, should only be activated after user consent has been granted. The Varify Tracking Activation Event is available for this purpose—make sure that the „Start Tracking on activation event” option is enabled under Tracking Setup > Advanced Setup (default). Learn more about how this works here:
/tracking-integrations/tracking-via-consent/
Option 2: Experiment delivery with user consent, tracking with user consent
Embed the Varify script with user consent and disable the „Start Tracking on activation event“ option under Tracking Setup > Advanced Setup.
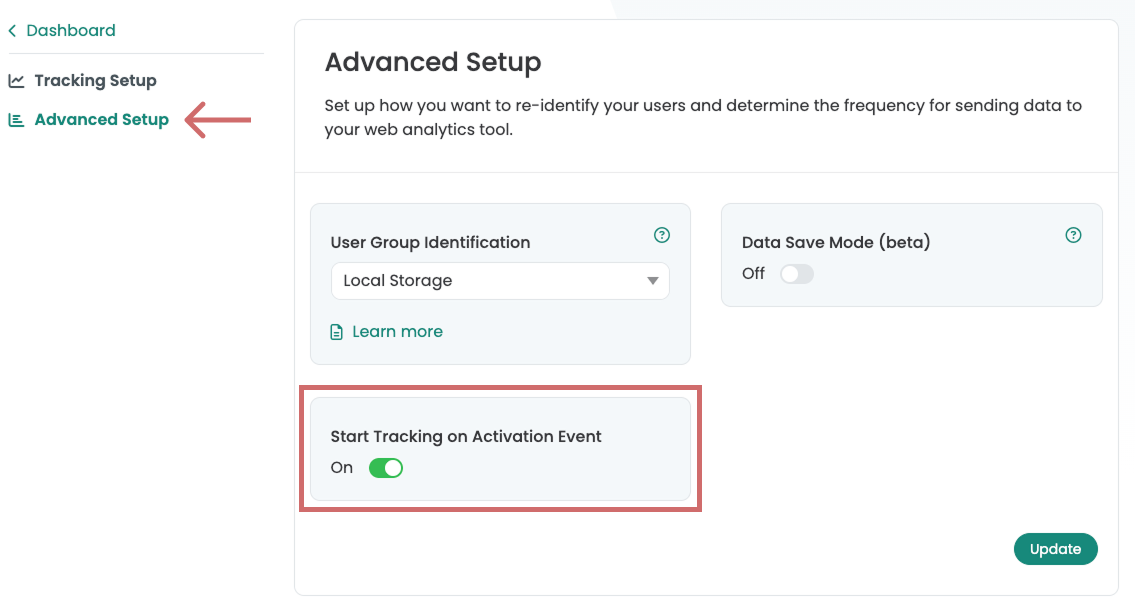
Option 3: Experiment Delivery Without User Consent, Tracking Without User Consent
Embed the Varify script without user consent and disable the „Start Tracking on activation event“ option under Tracking Setup > Advanced Setup.
econda direct integration
Select direct integration if you have integrated econda Analytics directly into your source code via the emos3 script and want to send the events directly via it.
Note: If you use the direct integration, the Tag Manager integration is not required.
Setting the A/B testing setup in Varify
For direct integration with econda, set the A/B testing options in Varify as follows:
- In the dashboard, click on „A/B Testing Options“.
- Then select „Go to Tracking Setup“.
- Under „Which web analytics tool do you use?“ you choose „Google Analytics 4“ from.
- Under „Do you have Google Tag Manager installed on your website?“ you choose „No“.
- Under „How would you like Varify to send data to your web analytics tool?“ you choose „Manually“.
- Save the changes by clicking on „Update“.
Insert tracking script on your website
Add the following JavaScript snippet to every page on which econda and Varify are active. The script listens for the Varify DataLayer event and automatically sends the experiment information to econda:
<script>
  // Varify.io – econda Direktintegration
  (function() {
    window.dataLayer = window.dataLayer || [];
    var originalPush = window.dataLayer.push.bind(window.dataLayer);
    window.dataLayer.push = function(obj) {
      originalPush(obj);
      if (obj && obj.event === 'varify' && obj.varify_experimentName && obj.varify_variationName) {
        if (window.emos3 && typeof window.emos3.send === 'function') {
          window.emos3.send({
            abtest: [[obj.varify_experimentName, obj.varify_variationName]],
            type: 'event'
          });
        }
      }
    };
    // Bereits im DataLayer vorhandene Events verarbeiten
    for (var i = 0; i < window.dataLayer.length; i++) {
      var entry = window.dataLayer[i];
      if (entry && entry.event === 'varify' && entry.varify_experimentName && entry.varify_variationName) {
        if (window.emos3 && typeof window.emos3.send === 'function') {
          window.emos3.send({
            abtest: [[entry.varify_experimentName, entry.varify_variationName]],
            type: 'event'
          });
        }
      }
    }
  })();
</script>
This is how it works: When Varify runs an experiment, a DataLayer event varify using the variables varify_experimentName and varify_variationName pushed. varify_experimentName contains the name of the experiment, varify_variationName the name of the variation that was played. The script intercepts this event and sends both values as econda tested-Event continues.
econda integration with Google Tag Manager
Set analytics connection
Note: If you use the Google Tag Manager integration, the tracking setup in Varify must be set to "Google Tag Manager".
Before you start using Google Tag Manager, you should first make the appropriate settings in your dashboard:
- In the dashboard, go to „A/B Testing Options“ and select „Go to Tracking Setup.“.
- Under „Which web analytics tool do you use?“, select „Google Analytics 4.“.
- Under “Do you have Google Tag Manager installed on your website?”, select “Yes.”.
- Under “How would you like Varify to send data to your web analytics tool?”, select “Manually.”.
- Confirm your selection by clicking „Update.“.
Adjustments in Google Tag Manager
To integrate Varify.io with econda via the Google Tag Manager, you need to create a tag in the Tag Manager that sends tracking events to econda. This allows you to analyze the results of your experiments in econda.
1. Create two data layer variables
These variables are used to provide tags with information of the A/B test.
Variable 1 – Experiment Name:
- Variable name: e.g.,.
VA ExperimentName(or choose your own name) - Name of the data layer variable:
varify_experimentName(spelling obligatory)
Variable 2 – Variation Name:
- Variable name: e.g.,.
VA VariationName(or choose your own name) - Name of the data layer variable:
varify_variationName(spelling obligatory)
2. Create a trigger
The trigger is the decisive event that triggers the transmission of data to the Analytics system.
- Trigger name: e.g.,.
Varify.io - Event(or choose your own name) - Trigger type: „Custom Event“ (required)
- Event name:
varify(spelling obligatory)
3. create a custom HTML tag
Tags are code snippets that send the values stored in the variables to your analytics tool.
- Tag name: e.g.,.
Varify.io - econda Tracking Linker(or choose your own name) - Configuration tag: Custom HTML
- Trigger: The previously created
Varify.io - Eventinsert
Paste the following code into the custom HTML tag:
<script>
  var experimentName = {{VA ExperimentName}};
  var variationName = {{VA VariationName}};

  function sendToEconda() {
    if (window.emos3 && typeof window.emos3.send === 'function') {
      window.emos3.send({
        abtest : [[experimentName, variationName]],
        type : 'event'
      });
    } else {
      setTimeout(sendToEconda, 200);
    }
  }

  if (experimentName) {
    sendToEconda();
  }
</script>
Important: The variable names in {{VA ExperimentName}} and {{VA VariationName}} must match the names you previously assigned to the DataLayer variables. Tip: If you use {{ all created variables are suggested to you.